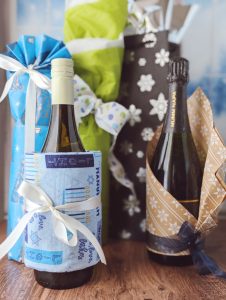
Photo by: Denise M. Gardner
Have you ever thought it takes too much time and effort into making a wine bottle gift look presentable and charming?
Well have no fear!
I’m here to show you how to add a touch of pizzazz to your wine gifts for this holiday season! Whether you’re bringing a bottle of wine to share with the host/hostess of a holiday party, gifting something special to a loved one, or looking for a trendy gift exchange amongst friends, these are tried and true EASY ways to present a bottle of wine.
First, Pick a Wine
Always select a wine your gift recipient loves, or a wine you’d simply love to share.
When in doubt, choose sparkling wine.
I know I go to sparkling wine a lot, but that’s because A) I have a lot of doubt in what people will enjoy, and B) almost everyone enjoys sparkling wine or finds a place in their lives to use it.
Sparkling wines pretty much go with every dinner occasion, as they pair easily with many foods. Plus, bubbly is festive, and this is a festive season! They are going to need a bottle of bubbly in about… 30 days! You could be literally checking off one of their things on their to-do list in the near future. Finally, sparkling wine can easily get sweetened in wine cocktails, which makes it an easy alcohol for mixed wine cocktails.
Otherwise, if you have an idea on what your host or friend would like, choose a wine they will appreciate. Always choose something to their preferences if you know them well.
Or, share a bottle that you simply find enjoyable. Over the years I’ve written tips on how to find that perfect bottle. Don’t get overwhelmed in the brand or price; just go with what seems good to you. As you will see in a minute, there are lots of ways to dress up a bottle of wine so that the gift is thoughtful regardless of the brand selection.
Accessories
While wine gift bags are an easy go-to, it’s fairly easy to make a bottle of a wine a little more glamorous and creative with some simple wrapping skills.
One easy way to personalize a bottle of wine is to provide something to pair with it. In my experience, the extra touch goes a long way. Consider how you plan on wrapping the bottle. For example, if you plan on wrapping the bottle with paper then the added accessory has to be small enough to tie to a ribbon. Or you can opt for a larger accessory that the bottle may go alongside in a box, within the item itself or go into something like a gift basket.
Here are some of my favorite accessories to add to a bottle of wine, based on size!
Small Accessories that Tie to a Ribbon:
- Teaspressa Luxe Sugar Cubes (especially great with sparkling wine)
- Corkscrews
- Ornaments
- Cheese Knives
- Stainless Drinking Straws
- Cloth Cocktail Napkins
- Cute Pens/Markers/Pencils
- Honey Sticks
- Sun Catchers or Sun Crystals
- Bracelet
- Tickets to an Event
- Gift Cards or Gift Certificates
Larger Accessories that a Wine Bottle can Fit Into (using the item as the “wrapping paper”):
- Cozy Slippers or Soft Socks
- Tea Towels
- Cloth Napkins
- T-Shirt or Long-Sleeved Shirt
Accessories for a Gift Basket
- Cloth Napkins
- Corkscrews
- Olive Oil and/or Vinegar
- Oil and Vinegar Bottle
- Wine Glasses
- Corkcicle Glasses
- Themed Salt and Pepper Shakers
- Picture Frame
- Scented Candle
- Cheese Board or Plate
- Bar Snacks or Crackers
- Shelf-Stable Cheese
- Decanter Brush and/or Decanter Beads
- Cozy Slippers
- Mulling Spices
- Books
- Cocktail Picks
- Bar Soaps or Bath Bombs
- Nice Pen and Paper/Journal
- Craft Kits
- Napkin Rings
- Wine Journal
Additional Items You’ll Need for Preparing Your Wine Gift
Wine baskets aside, I’m going to focus on wrapping a single bottle of wine as there are number of ways you can accomplish this in a tasteful and creative way.
If all you have is wrapping paper or tissue paper, that will work! You can also use a hand towel here and even cloth napkins.
You will likely also need Scotch tape. When using wrapping paper or tissue paper, double-sided sticky tape is a cleaner look. However, if you have just have regular Scotch tape, that will work, too!
And finally, a ribbon. The ribbon is almost a necessity for wrapping a bottle. Cloth ribbon or jute ribbon is going to work well. If you want more structure in your bow, use a wired ribbon. If all you have available is one-time-use ribbon, that’s okay, too.
Selecting a Paper
I find that wine bottles present better as gifts when using wrapping paper with a simpler design. Think polka-dots, stripes, snowflakes, stars, etc. Single color wrapping paper, usually in a gold or silver shade, also works well. This is why tissue paper is also a great alternative because tissue paper is often a single color. I also like using brown-toned wrapping paper. Again, the simplicity in the paper makes the bottle look more elegant.
Wrapping the Bottle
Wine Gift Bags
Most grocery stores, card stores (think Hallmark), and wine stores offer wine gift bags. (1) The bags are the appropriate shape and size for one 750-mL bottle (the standard size) of wine. This is certainly the simplest road you can take when wrapping a wine bottle. (2) Simply add the bottle to the bag.
I recommend adding a bunch of tissue paper at the top to give it a bit more pizzazz.
(3) Take one sheet of tissue paper and bunch the paper at center crease. It doesn’t have to be perfect. The center gets scrunched to fit in the bag while the ends remain straight and fluffy. (4) Insert the scrunched end into the top of the bag, covering the bottle, allowing for some tissue to flair outside of the bag.
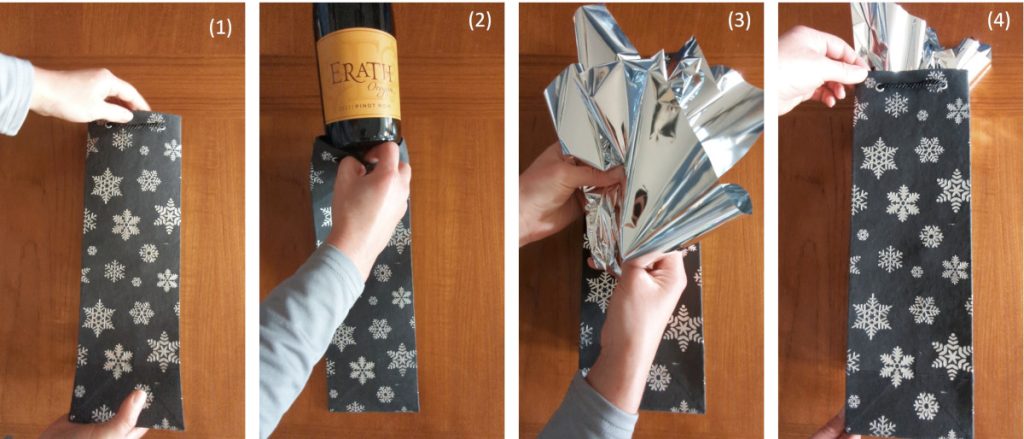
Photo by: Denise M. Gardner
The Simple Wrap
The simplest way to wrap a bottle is to actually wrap the bottle. You can use wrapping paper or tissue paper or a combination for this style. In my example I used tissue paper.
Most tissue paper will come in a rectangular shape. When we go to roll the bottle in the tissue paper, you’ll notice this longer edge creates a rather tall top flair for some bottles. In my example, I left this flair long. But you can get around the long top by trimming the paper before rolling the bottle into the paper. You only need about 2 – 3 inches above the top of the bottle to make this look nice.
(1) Start by laying out the tissue or wrapping paper flat on a hard surface, like a table. Place the bottle diagonally near the bottom left corner of paper. (2) Secure the corner of the paper to the bottle with Scotch tape.
(3) Slowly roll the bottle, wrapping in the tissue paper. As you roll the bottle, (4) tuck the bottom edge of the paper to create a perpendicular line in sync with the bottom of the bottle. (5) This will keep the bottom edge of paper straight with the bottom of the paper. If you tuck too much, you’ll simply end up with a diagonal line to tape when you are finished rolling the bottle.
After sealing the paper with Scotch tape, scrunch the paper around the bottom neck of the bottle. (6) Add a ribbon to tighten the paper around the neck of the wine bottle. While tying a simple bow, you can add an accessory. Dangle the accessory from the ribbon to create a personal touch.
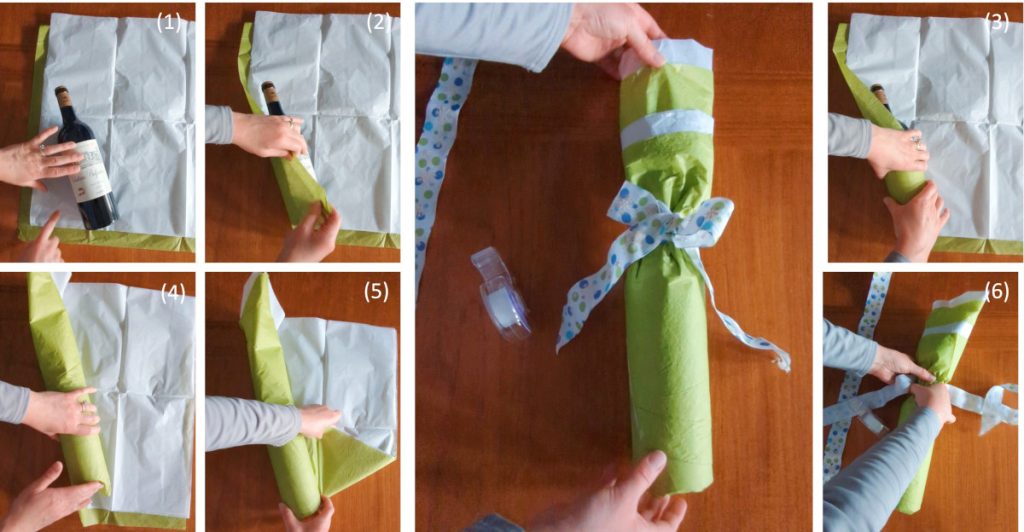
Photo by: Denise M. Gardner
Top Fan – Bag Illusion
This was one of my favorite styles of wrapping and I use for many jar-shaped presents including glass jars of beads, tumblers, and wine bottles. This fanned effect at the top of the bottle, creates the illusion of a bag, and may keep the recipient from knowing they are receiving a bottle of wine. This is a little trickier, but, I promise, you can accomplish this look. It’s not as difficult as it may seem.
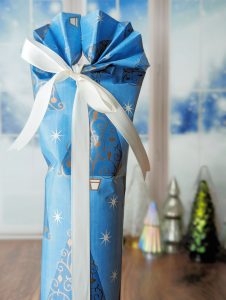
Photo by: Denise M. Gardner
Use actual wrapping paper for this. Wrapping paper that does not tear easily is recommended.
(1) Start by measuring the length of wrapping paper that you’ll need to cover the entire bottle. You’ll need to leave about 1 – 1.5 inches of paper for the bottom of the bottle, and at least 8 – 10 inches of paper above the top of the bottle. You can see in my example, I ended up trimming the paper slightly. (Note, you can also see my paper was slightly ripped and it didn’t matter at all!)
Position the bottle parallel to the side of the paper, leaving about 1 – 1.5 inches of paper towards the bottom of the bottle. (2) Secure the side of the paper to the bottle with Scotch tape.
(3) Roll the bottle tightly to cover with wrapping paper. (4) Seal the wrapping paper with Scotch tape. You may need multiple pieces of Scotch tape here.
(5 – 7) Fold in, bit by bit, the bottom portion of the paper around the bottom of the bottle. Secure with Scotch tape.
(8) Flatten the part of the paper that is above the top of the bottle. Secure both ends of the paper and begin (9) alternating folds of the paper. Each accordion fold should be about 0.5 – 0.75 inches wide. Continue the accordion fold until the paper reaches the top of the bottle.
(10) Secure the folds to the bottle by placing Scotch tape over the middle of the fold.
Fan out the paper carefully, and then secure the two sides of the fold by bringing them together over the top of the bottle and sealing with Scotch tape. If this leaves a small hold above the neck of the bottle, use that hole for a ribbon.
Trim a ribbon so that it will go over the entire length of the bottle twice. (11) Bring the back part of the ribbon through the hole in the fan. (12) At about the halfway point of the ribbon, secure it to the bottom of the bottle with Scotch tape. (13 – 14) Tie a bow directly below the fan. (Note: You may need to secure the ribbon with some extra Scotch tape to keep it from following off of the bottle. Add tape to the back of the bottle.)
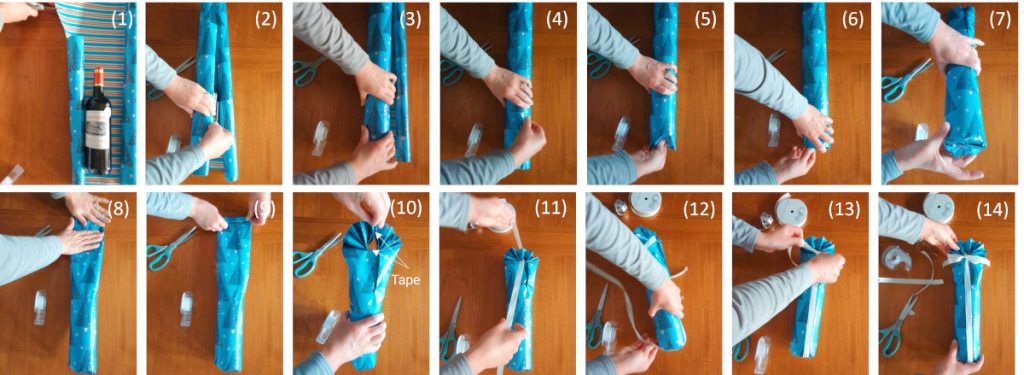
Photo by: Denise M. Gardner
Side Fan
An alternative style of wrapping is to create a side fan. In this case, the paper is more decorative, and part of the bottle is going to show. This could be a unique way to present a wine to a host/hostess at a dinner party.
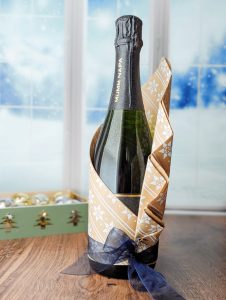
Photo by: Denise M. Gardner
For this wrapping technique, use actual wrapping paper. Cut the wrapping paper into an actual square. If you are using wrapping paper that has the lines on the back of the paper, make sure the number of squares are equal for both the length and width of the paper.
The square size of the paper is important as you are going to (1) fold the paper into a triangle by taking one corner to another, diagonally. The design of the paper should be showing.
(2) Place the bottle on top of the paper, and (3) fold over the left corner of the triangle slightly below the wine label. Secure the left corner of the triangle to the wine bottle with Scotch tape.
(4) Accordion fold the right side of the triangle until it (5) reaches the bottle. Once the paper hits the bottle, (6) use Scotch tape (or double sided sticky tape) to secure the bottom of the fan to the paper already secured on the bottle.
(7) Cover the tape by wrapping the bottom of the bottle with ribbon, and (8) tying the bow near the seam of where the two sides of the paper meet. (9) Make sure the bow is tight and does not slip off from the bottle. (10) Trim the ribbon as necessary.
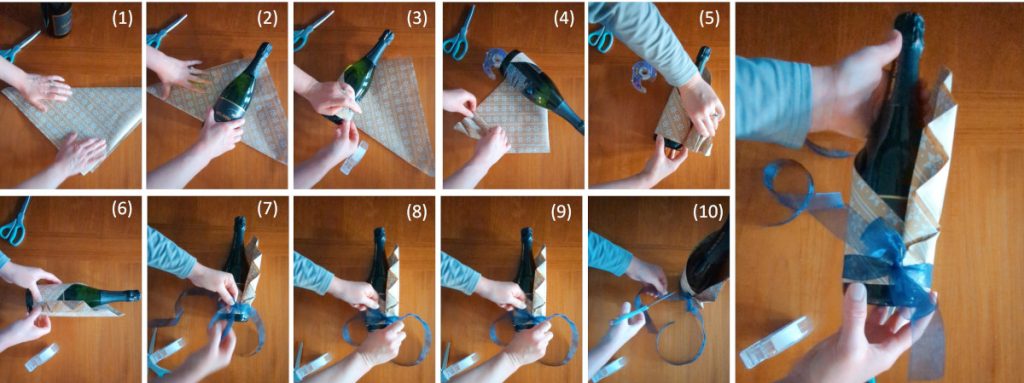
Photo by: Denise M. Gardner
Simple Tea Towel (or Cloth Napkin) Wrap
Two gifts in one package: a tea towel and a bottle of wine. In this case, the tea towel is used as the actual “wrapping paper” and secured to the bottle with a ribbon.
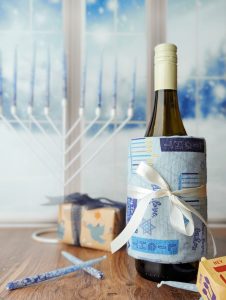
Photo by: Denise M. Gardner
While the simple scrunch-and-tie wrapping exists, I also like the simplicity of rolling a bottle in a tea towel. For this wrapping style, you will need a thinner tea towel or your average thickness for cloth napkins. The towel cannot be too thick or this wrap will not work.
Also note that there are other cloth folding techniques out there for wine bottles. However, many of those folding techniques require the cloth to be in a square shape instead of the standard rectangular shape associated with tea towels.
(1 – 3) Start by folding the tea towel into thirds. This will hide the edges of the tea towel.
(4) Lay out the tea towel, length-wise, and bring the bottle to the edge of the towel. (5) Roll the bottle, holding the towel, until the towel is fully used to cover the wine label.
(6) Secure with ribbon. Tie it tightly!
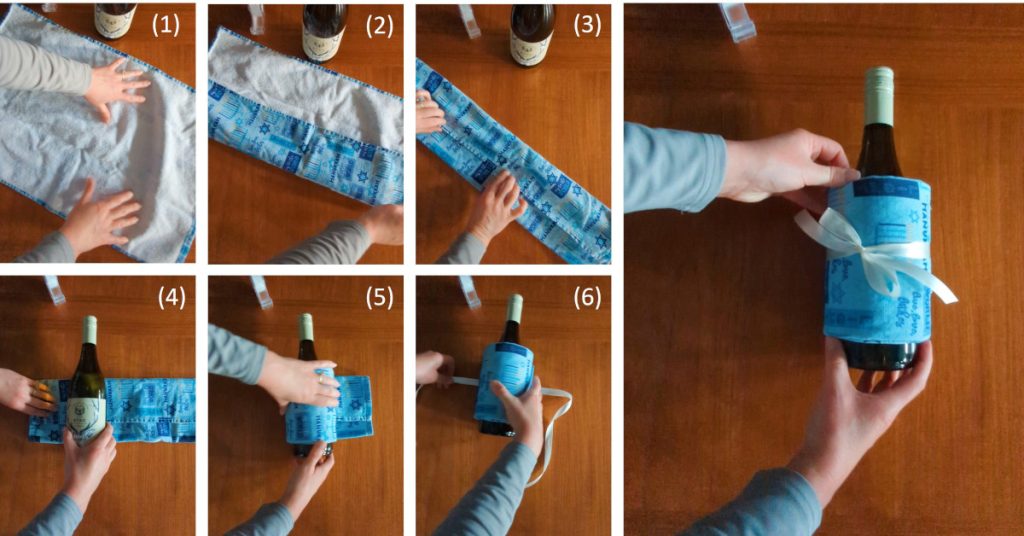
Photo by: Denise M. Gardner
For full videos on how to wrap these bottles, follow me on Instagram (@dgwinemaking). We would love to see you there!

